Hey everyone, This is a post written to introduce a new tool I have been writing called hashmatch. Hashmatch is a simple cli tool written in Go which has the simple purpose to compare two files by a hashing algorithm of your choice be it md5sum, sha1, sha256 or crc32. The purpose of this CLI tool can be to check for file tampering or to quickly get the hash value of a given file for forensics. The tool is powered by the cobra library for building CLIs. It follows the simple approach of traversing a directory and returning an array of hashes for files present. Below is the core logic for computing the hashes.
Scope for improvement:
Add test cases 🙈
support different output formats csv, json etc. (json support was recently added)
add support to browse remote directories via ssh/ftp.
create a website explaining the tool in detail.
The cli tool was inspired by the popular inbuilt md5sum command, which doesn’t have the ability to traverse directories or perform matches. hashmatch provides the same performance with support for additional algorithms as well.
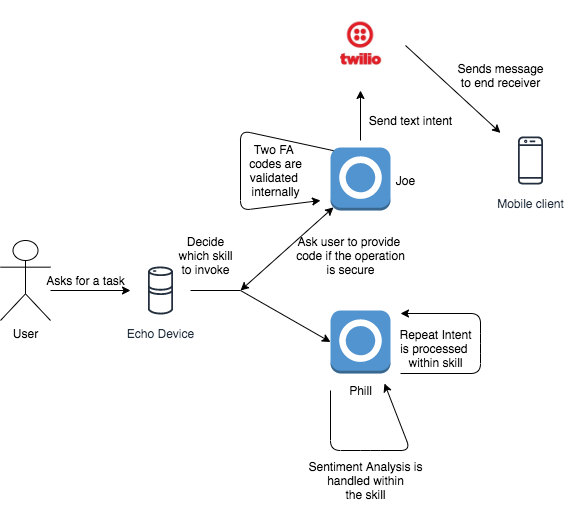
So a few years ago I began experimenting with building skills on the amazon alexa platform. I found the developer experience to be top-notch and the sdk’s provided to be easy to use. I created two skills name phill and joe. From my understanding developing a skill on the Alexa platform consists of 3 basic components.
Intents:
Intents are the VUI (voice user interface) equivalent of a software interface. They indicate the typical list of features and functionality to wish to accomplish from your Alexa Skill.
The above are the intents I had assigned to the skill Joe. Which are to perform sentiment analysis, Say a greeting, Send a text message, validate a Two-Factor Authentication code and perform a secure action.
Utterances:
Utterances are like the implementations of the above intents. They are essentially the product of applying context to intents to make them easier to understand and implement. Think of them as test cases for human interaction with our skill.
The above are utterances which basically train alexa to understand which intent to pickup when receiving a particular type of input.
The Actual Skill itself:
Alexa skill support a variety of execution backends. For ease of integration and convenience I chose to use AWS lambda. Attached below is the code in javascript for the skill joe.
I made use of different client libraries for all the various intents I wanted to accomplish. Such as twilio for sending text messages. speakeasy for two-fa and a simple sentiment analyzer. Lambda allows for configuring environment variables which contained all my configurations in a separate env file that could be uploaded directly to aws.
Architecture Diagram
Scope for improvement:
Try not to write a blog post about something you built 3 years ago. 😛
Setting up CI/CD to simplify the development process
Continue to have fun with whatever you are planning to achieve.
Hey folks, I know I have been under the radar for a really long time. Its because I have attempted a lot of different projects throughout 2018 and the later half of 2017. Some of the projects have not had the desired level of success. However there is no such thing as failure there are only lessons waiting to be learned.
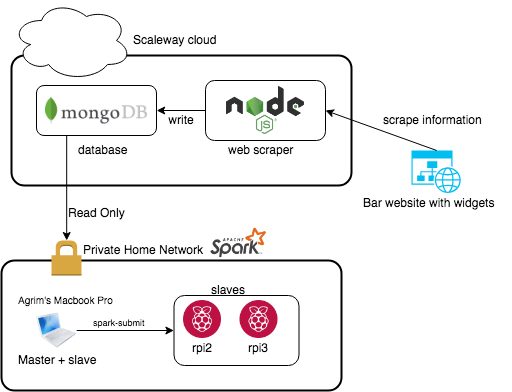
With that being said this was a project I had done in the later half of 2017. The idea was given to me by a former colleague. The goal was to scrape data from a bar’s website which shared the amount of a given brand remaining at any given time. After I have collected this data I wanted to perform some time series analysis using the ARIMA model and execute it on an Apache Spark cluster. Rough architecture diagram is attached below.
First implementation of the project
So the website I was trying to scrape had a widget that shows a small barrel which would change color / height of filling depending upon how much beer of that particular brand was left behind. I needed to parse some CSS so I found cheerio.js to be helpful in ingesting html and rendering the required elements correctly. Once that was done using some simple mathematics I was able to compute the percentage remaining. Attached the censored source code for the scraper below
I ran the above for about 2 weeks on one of my VPS’s. Once I had enough data I went ahead and began implementing the ARIMA model code which I got from here.
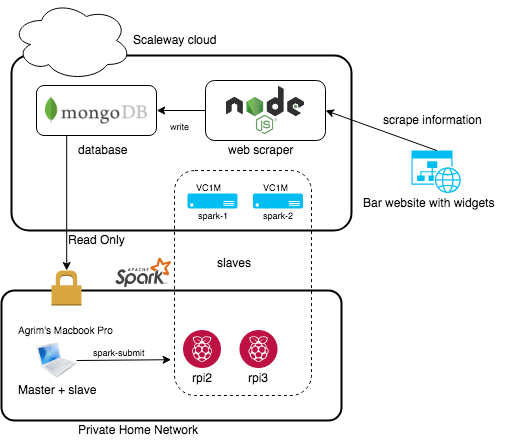
So initially it was taking forever to run the model on two raspberry pi’s plus my macbook, So I decided to add some more resources and scale up my solution. Using the brilliant scaleway cli I spun up 2 VC1M instances and added them as slaves in my deployment. That changed my architecture as follows.
Adding additional compute nodes as slaves
The great thing about the scaleway cli is that its commands resemble the docker cli ,which is in muscle memory for me. I could spin up/down vms on the fly just like I would do with docker containers. This made the project a lot more affordable as I could spin up the compute nodes only when I want to run the model. I had to do a small hack by running a local tunnel on my macbook so that the vms could call into my laptop. So now that all the sunshine and rainbows part is over lets get to the actual scrutiny of the project.
So why did this project fail ?
Data was very inconsistent.
CSS rendering was inaccurate leading to bad measurements.
Not enough samples were collected.
Database was not ideal for time-series data analysis
What were the key learnings of this experiment?
Apache Spark is an amazing distributed computing engine that can be setup easily and runs across different architectures ARM,x86 etc due to the portable nature of the JVM.
Data is the new gold, without good data you cannot do any kind of useful analysis.
We are living in an awesome timeline where we can request resources dynamically and pay only for what we use.
Always do some basic groundwork like a technical evaluation before starting any project.
Thats all for this blog post stay tuned for more exciting and successful projects coming up!
Disclaimer: I have tried not to mention any brands/locations or url’s for privacy reasons. Also contributions are welcome!
Hey everyone, I know it’s been a while I have been busy working on a bunch of exciting stuff to keep you guys entertained. This post is about a fun approach to solving a common problem we face. Wouldn’t it be nice if you could summon everyone at the press of a button. Well now you can using an AWS IoT Button. The original ones were given away for free at an AWS ReInvent event some time ago. The IoT button is basically a Dash button that is unlocked, programmable and 3 times more expensive.
Someone please explain this sorcery
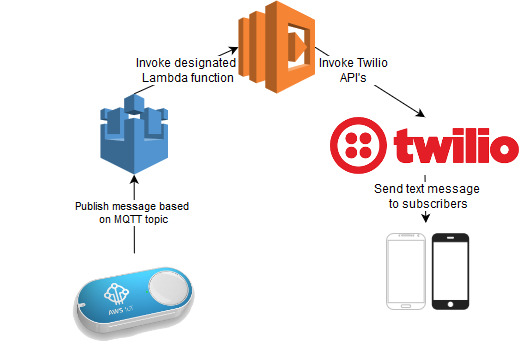
Leaving all the business reasons aside. The IoT button comes with a non-removable battery and is good for only about 2000 clicks. Amazon definitely has everything figured out it took me just 5 minutes to get up and running. I just unboxed the button downloaded the app on my phone. Connected to the Wi-Fi, logged into my AWS account and next thing you know I could see all my lambda functions and API gateway endpoints that could be assigned to it. So the ideal use case for me was to invite everyone in the household for a given meal. It is normally a hassle to coordinate with everyone and try to work things out this project simplifies it down to a single click. This is what the solution architecture looks like.
I have chosen to use the service twilio to achieve the end goal of notifying users. Twilio is an amazingly affordable telecommunication service that provides a programmable interface. The provide both REST endpoints as well as libraries for popular languages like Python, Javascript etc. You will see more projects of mine using them in the future. So each IoT button comes with a GUID dcn number on the back of it. This dcn number can be using the register the Button as a Thing for AWS IoT. Once the button is registered It is available as a trigger that can invoke a variety of AWS services. I have decided that 2017 is going to be the year of serverless therefore I have built this app to be run serverless using AWS lambda. As with everything I do this project is completely open sourced and can be cloned at
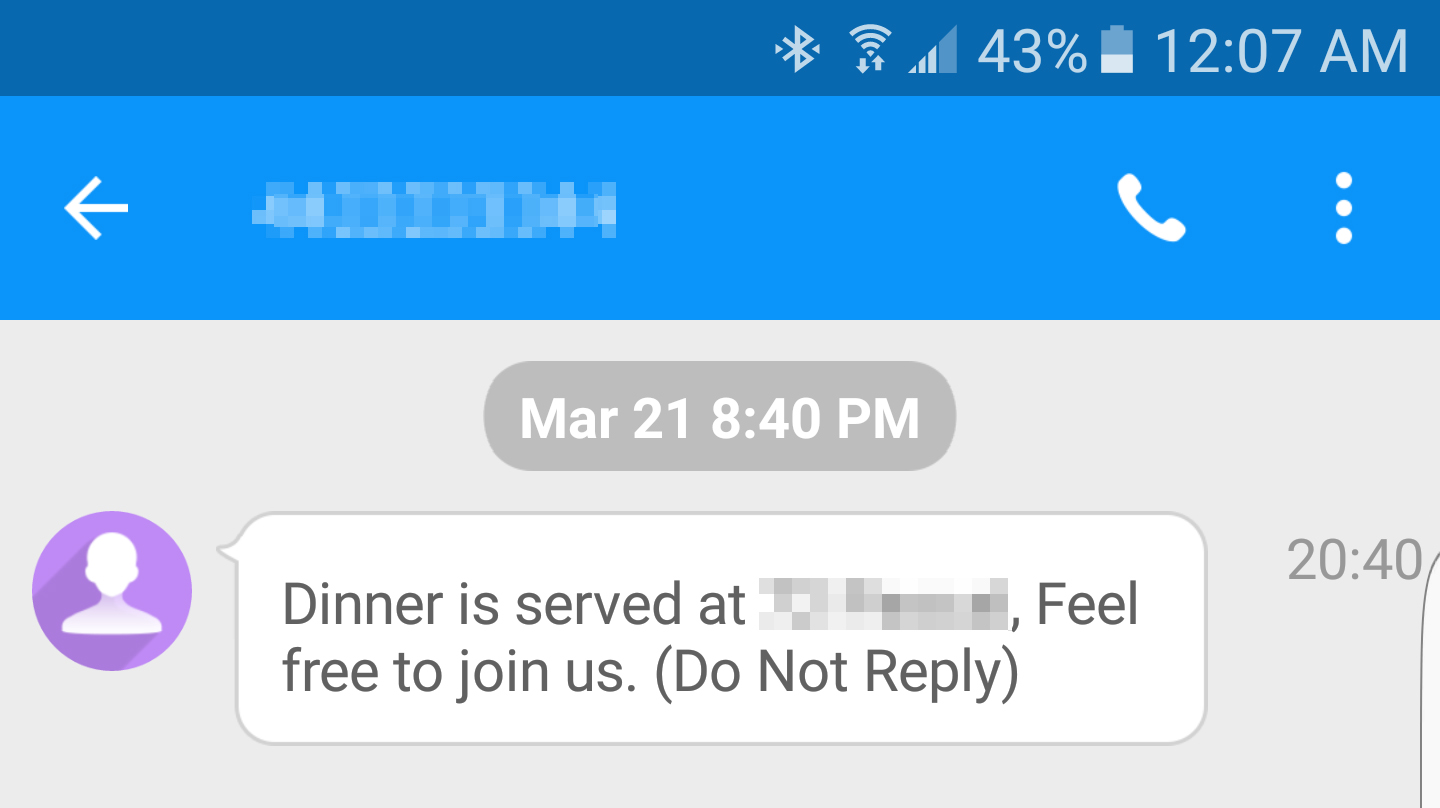
Its actually really cool so when the button is clicked there is a small led indicator on the IoT button that blinks white when triggered and keeps blinking for a while. It eventually turns either green (success) or red (failure) depending upon the outcome of the Lambda execution. The result being a text message sent from my Twilio number which is as follows.
The size of this project is quite small but it has proven to be very useful. That being said there is always scope for improvement.
Add scheduling to determine who is availble on weekdays/weekends for which meal
Incorporate the ability to handle a response from to user to confirm/decline their availibility
Incase text message delivery fails have an alternate notification mechanism such as email
Hope you guys enjoyed this post. Expect more exciting posts to ECHO in the future. 😉
Hey Everyone,
Sorry for the lack of updates, I have been working on something so awesome it should technically be 3 blog posts and not one. It was such an intense project that I ended up bricking one of my Raspberry PIs by corrupting the memory card and causing segmentation faults. The entire fiasco is also what slowed down my progress. But anyways to start off this new year I wanted to shift my focus on upcoming and bleeding edge technologies like OpenCV. The overall idea is to find the most dominant color in a given frame so that if something was to remain camouflaged it would have the best chances with the chosen color. To implement this I used K-means clustering to divide the image into two sections and determine which color occupied the most space. The efficiency of this algorithm improves as we increase the value of K (the number of clusters). But for the sake of speed I chose to use only 2 clusters. Here is what the algorithm looks like
Capture video using RPI camera
Stream the video as a supported format MJPEG
Load the video into OpenCV
Process every frame as a Numpy Array
Reduce the size of the Image for easier computation
Using K Means Cluster create a histogram with K sections
Determine largest section in histogram
Render color on 8×8 LED Grid
The solution architecture is as follows
At first, I tried to everything using only my 2 raspberry pi’s but the problems I face was that it took 14 hours to compile! and the performance was incredibly poor. So I thought it was best to delegate the responsibilities to a container in the cloud which was very easy to setup and configure. They are 3 main components in the system.
So after installing the MJPEG streaming module on my Pi2 I wrote a simple wrapper shell script for it.
This would create a MJPEG stream at 'http://< rpi-ip >:8080/?action=stream'
The next step was to consume this stream in AWS. I created a simple base container using the anaconda framework for python. setting OpenCV was as easy as conda install opencv . Next is the meat of the project code for which is shared below.
So this is what the EC2 container sees. Input
And this is the histogram generated after K Means clustering. Output
As you can see Red seems to be the most dominant color in the frame. You can tell by the amount of time taken for the neural network to compute the dominant color that this project is in an infancy stage. Let me mention the scope for improvement for this project.
It is fundamentally wrong to use a value of k=2, I need k to be the exact number of different colors
To provide the color for the LED board I should use a pub-sub system instead of REST as acknowledgment of request is not necessary
In order to achieve true camouflage only computing to colour is not enough I need to figure out patterns and textures
Overall performance of the system must improve by using a distributed system approach like (MPI) or tweaking the algorithm
Hope you guys liked my project. Look forward to more bleeding edge projects in the year ahead